Technology
|
20 June 2025
How to Draw Spider Web - Easy Step-by-Step Tutorial
Written by Faizan
Full Stack Developer
Learn how to draw spider web step-by-step with this easy tutorial! Perfect for beginners. Explore techniques for corner and full webs, plus creative tips!

Table of Contents
Creating a spider web drawing may seem daunting, but it’s surprisingly simple when broken down into steps. Whether you want to add a touch of spooky charm to your artwork, experiment with new techniques, or just try something fun, learning how to draw a spider web will elevate your skills.
This guide explores multiple methods, practical tips, and creative ideas to help you craft stunning spider web drawings effortlessly.
Why Learn How to Draw Spider Web?
Spider webs are incredibly versatile in art. They can be used to symbolize mystery, nature, or even precision. Plus, drawing one improves your understanding of shapes, lines, and spatial arrangement.
By mastering a few basic techniques, you'll soon be creating intricate designs that stand out in any composition.
What You’ll Need
Before starting, ensure you have the right supplies:
- A pencil (preferably mechanical for sharper lines)
- Eraser (a kneaded or click eraser works best)
- Paper or cardstock
- Thin or colored markers
- Optional: Alcohol-based markers for adding vibrant colors
Having these materials on hand will make the drawing process seamless.
Step 1: Drawing a Corner Spider Web
This method is perfect for when you want the web to sit snugly in one corner of your page.
1. Sketch the Base Framework
Start by drawing two straight lines at a 90-degree angle. One should run horizontally while the other runs vertically from the corner point. These will act as the anchors for your web.
Add additional lines radiating outward from the corner to mimic the web structure. Typically, 6–8 lines offer a balanced look.
2. Create the Webbing Pattern
Between the radiating lines, draw short, curved lines (inverted arcs) that connect one anchor line to the next. These arcs should follow the curve of the web. Progress from the corner outward, spacing each layer of arcs evenly.
3. Add Final Details
Add extra layers of curved lines to fill in the web. Clean up the sketch by tracing over your lines with a thin marker or pen. Once outlined, erase any unnecessary pencil marks.
Pro Tip: Use a ruler for straight lines and maintain light pencil strokes to make corrections easier.
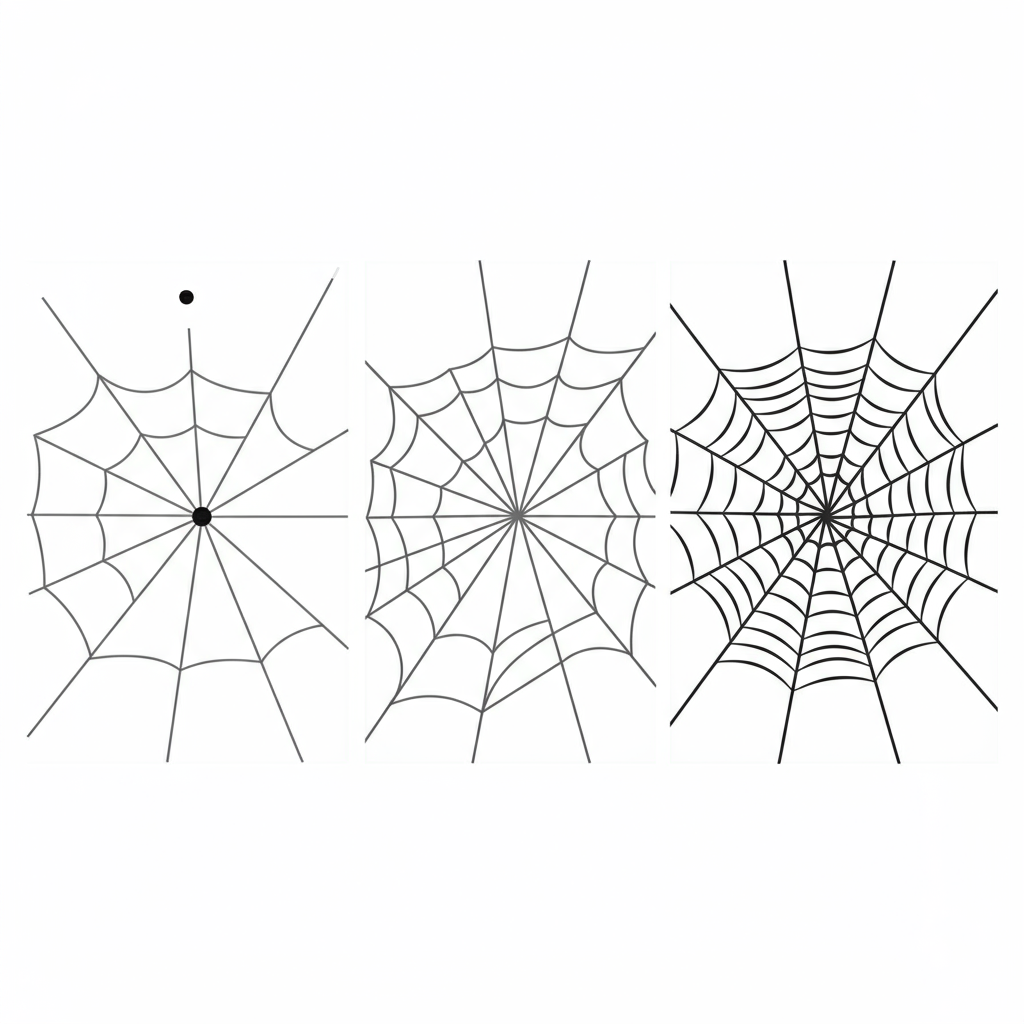
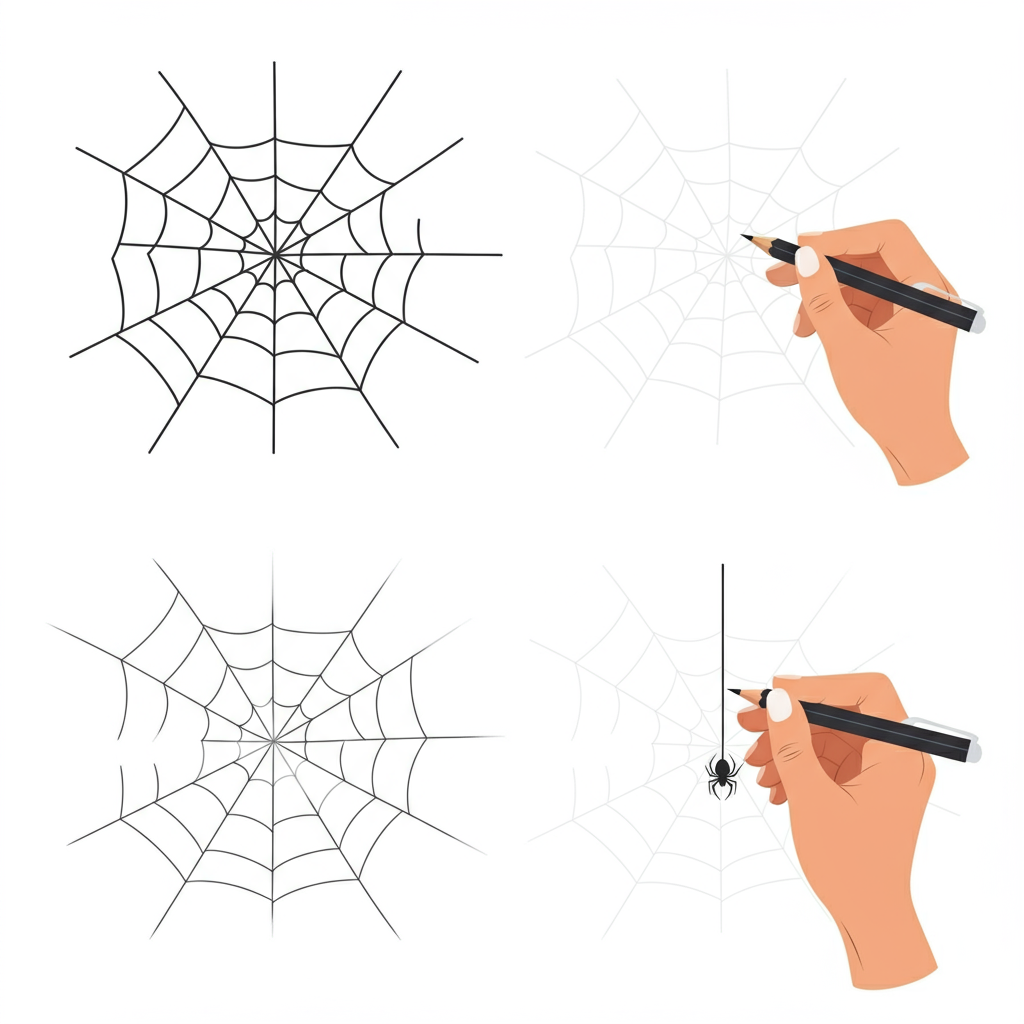
Step 2: Drawing a Full Spider Web
A full spider web is perfect if you want the design to cover the entire page or dominate your artwork.
1. Start at the Center
Place a small dot in the center of your paper. This will be the meeting point for all web strands.
2. Add Radiating Lines
Use a ruler and draw between 8 to 12 straight lines radiating out from the central point. Imagine slicing a pie into equal sections.
3. Form the Outer Webbing
Starting at the innermost section, connect the radiating lines with small arcs or curved lines. Work outward in circular layers. Keep the spacing even to create a symmetrical appearance.
4. Enhance the Look
Once you've completed the web structure:
- Outline your sketch with a thin black pen or colored marker.
- Experiment with varying line thickness to add depth and dimension.
Solution for Beginners: If the arcs in the web look uneven, lightly sketch guide circles around your center point first. This ensures your webbing follows a smooth curve.
Step 3: Adding Colors and Details
To make your spider web truly stand out:
Color the Background: Use alcohol-based markers for a gradient effect or shaded background to emphasize the web design.
Highlight the Web: Use a white gelly roll pen to add fine highlights, making the web look delicate and realistic.
Add a Spider: Draw a small spider in the center or hanging from one of the strands for added interest. A simple circle for the body and straight lines for legs will do the trick.
Experimentation Idea: Try drawing a glowing web using metallic or glitter gel pens on dark paper for a dramatic effect.
Common Mistakes and How to Avoid Them
Uneven Web Positions: If your web looks off-center, use guides to plan the layout before adding details.
Smudging Ink: Allow your pen outlines to dry fully before erasing pencil lines. Avoid resting your hand on wet ink while you draw.
Overcomplicating the Design: Simplify your arcs and lines if it feels overwhelming. Precision builds with practice!
Explore Further Drawing Ideas
Here are a few creative variations to try after mastering the basics:
- Realistic Webs: Add dew drops using highlights and shadowing techniques.
- Themed Webs: Create spider webs incorporating seasonal themes like Halloween or whimsical shapes like hearts or stars.
- Experimental Webs: Use colored pencils or watercolors to blend playful hues into the webbing.
Using these guides, you can explore more techniques, styles, and details to refine your artwork.
Additionally, if you're exploring cross-skills, learning how to seamlessly transcribe thoughts or audio memos into text can enhance productivity in creative projects.
Check out how to transcribe voice memos for a skill that complements organizing and recording your drawing processes.
Final Thoughts
Drawing a spider web is an excellent exercise for beginners and experienced artists alike. By breaking the process into simple steps, you’ll quickly grasp the basics and gain confidence in your skills. Start small, practice regularly, and challenge yourself to create vivid designs with creative elements!
Now it’s your turn! Grab your pencils, and give it a shot. With every attempt, your spider webs will get more intricate and captivating.
FAQ - How to Draw a Spider Web
What tools do I need to draw a spider web?
To draw a spider web, you’ll need basic art supplies such as:
- A pencil
- Eraser
- Paper or cardstock
- Ruler (optional for precise lines)
- Thin markers or pens for outlining
- Optional colored markers or gel pens for adding details
What is the first step to drawing a spider web?
The first step is creating a framework. For a corner web, draw two perpendicular lines meeting at a corner. For a full web, place a dot in the center of the paper and draw several radiating lines outward, like spokes on a wheel.
How do I make the web look realistic?
To create a realistic appearance:
Use curved lines (inverted arcs) between the radiating lines to mimic webbing.
Space the arcs evenly to maintain symmetry.
Add small details like dew drops using highlights or shadows for a more lifelike touch.
Why do my arcs look uneven?
Uneven arcs are common for beginners. To improve:
- Lightly sketch guide circles around the center point to ensure consistency.
- Practice making smooth, steady strokes. Experiment with different arc sizes.
How can I add colors or effects to my spider web?
You can enhance your web using:
- Colored markers: Add subtle gradients or vibrant backgrounds.
- White pens: Create highlights to simulate light reflections or enhance curved lines.
- Metallic or glitter pens: Use on dark paper for a glowing effect.
Can I draw a spider web without a ruler?
Yes! While a ruler helps make straight lines, spider webs don’t need to be perfectly accurate. Freehand drawing provides a more natural, organic look.
How can I avoid smudging my drawing?
To prevent smudges, follow these tips:
- Allow pen or marker outlines to dry completely before erasing pencil lines.
- Work from the top of the page downward to avoid resting your hand on wet ink.
What are some creative variations for spider webs?
Here are a few creative ideas to try:
- Seasonal themes: Add Halloween-inspired elements like pumpkins or bats.
- Shape variations: Draw heart-shaped or star-shaped webs.
- Realistic details: Incorporate a small spider and droplets of “dew” to add realism.
How long does it take to master drawing spider webs?
It depends on your practice and skill level. Beginners might need a few attempts to draw consistent lines and arcs, while experienced artists can quickly create intricate designs. Regular practice accelerates improvement.
How can I fix mistakes in my drawing?
Use an eraser to remove pencil errors before inking the web. For pen mistakes, you can:
- Incorporate the error into your design as an intentional variation.
- Trace over with correction pens or white gel pens for corrections.

Revolutionize Your Workflow with Transcripter
Ready to streamline your content creation?